Homing and Offset Calibration
What is Homing and why is it Needed?
Homing describes a procedure with which joints using relative encoders can find their absolute position. It is automatically performed when initialising the robot to ensure the reported joint positions are correct.
For a more detailed description and a definition of the terms zero position, home position and home offset see the first two sections of Homing of the Joints in the documentation of the robot_fingers package (note, however, that the homing methods implemented there differ from the one used in robot_interfaces_solo).
How is Homing Implemented in robot_interfaces_solo?
Since the Solo robots don’t have end-stops on all joints, the homing can only be done in a semi-automatic way:
Before powering the robot on, manually move all joints to the initial position. The initial position is the starting point for the homing and is defined when doing the calibration. This step does not need to be super accurate (see info box below).
After the robot is powered, do not manually move the joints anymore! Now start an application that creates and initialises a robot back end (see Examples). During initialisation, the homing is executed. All joints will slowly move until they reach the next encoder index tick. The position of the index tick is used as home position. Based on this the zero position is set and all joints will slowly move there.
At the end of the initialisation, all joints should be at their zero position. If this is not the case, it means that something went wrong. In this case power the robot off and start again. If the robot consistently reaches a wrong position, you may need to recalibrate the home offsets, see below.
The zero position is set directly on the motor boards, so the encoder index search only happens on the first run after powering the robot on. On following runs (assuming you don’t turn the power off in between), the initial position does not matter and all joints should directly move to the zero position.
Summary:
For the first run:
Make sure robot is powered off
Move all joints to the initial position (with power off!)
Turn power on
Initialise backend. Joints will move a bit back and forth.
All joints should now be at the desired zero position. If this is not the case, go back to 1.
For follow-up runs, as long as the robot is not powered off:
Initialise backend. Joints will move to the zero position.
All joints should now be at the desired zero position. If this is not the case, power off and start from scratch.
Info
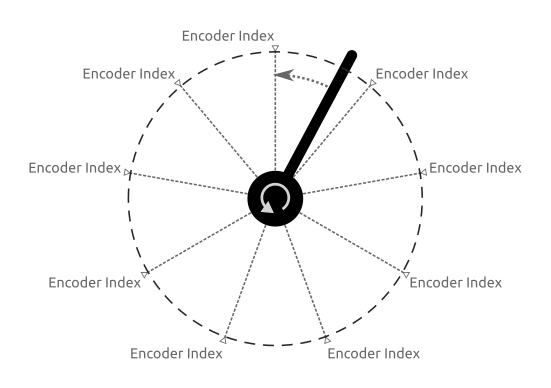
Keep in mind that due to gear ration between motor and joint, the motor does several revolutions for one joint revolution and thus the encoder index appears multiple times at different joint positions. Therefore it is important to always start from the same initial position to make sure the correct encoder index is found.
The gear ratio of Solo is 9:1 for all joints. So for one joint revolution the encoder index is observed nine times, dividing the range into nine “index segments”. The exact initial position from which a joint starts the index search is not so important, as long as it is always within the same segment.

If after homing the zero position differs from the expected position by exactly 40° (=⅑ of a revolution), the reason is likely that the joint had a bad initial position and thus did start from a wrong segment. This can likely happen if the initial position that was used during calibration is close to an encoder index. In this case it might be worth repeating the calibration with a slightly different initial position for that joint.
Home Offset Calibration
Before using the robot, the home offsets need to be calibrated. This can be done in the following way (note that the order of steps is important!):
Make sure robot is powered off.
Manually move the joints to the initial position[1].
Turn power on.
Run the following command:
# for Solo12:
ros2 run solo solo12_hardware_calibration <network-interface>

# for Solo8:
ros2 run solo solo8_hardware_calibration <network-interface>
This will find the next encoder indices (this is the home position) and then start printing the offset.
Manually move the joints to the desired zero position.
Stop
solo*_hardware_calibration(via Ctrl+C). Copy the last offsets that were printed to the terminal and insert them in the configuration file as value forhome_offset_rad(see Configuration).