About the Software Architecture
Nomenclature
In our software we are using the terms observation for sensor data provided by the robot (e.g. joint positions, velocities, etc.) and action for commands sent to the robot (target torque or position).
Architecture
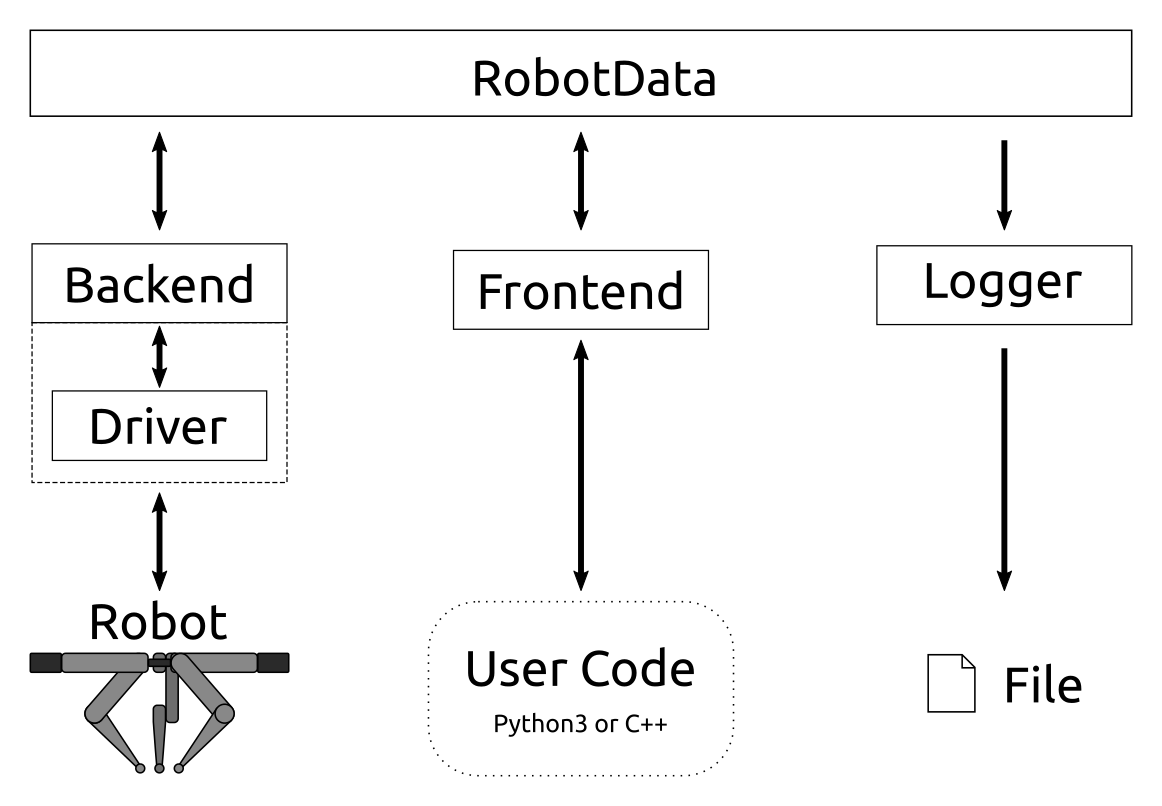
The software is designed in a modular way. There is a central module, RobotData, which manages all the data (sensor readings, commands sent by the user, etc.). All other modules connect to the robot data and use it as a sole channel of communication, i.e. there is no direct connection between the modules. See the figure above for an illustration.
Existing modules:
Back end
Front end
Logger
All modules operate independent of each other and communicate only through the RobotData. This makes it easy to add new modules as needed, e.g. one could easily implement a ROS publisher module such that the robot could be visualized in ROS tools like RViz. Further, when using the multi-process robot data, modules like the logger or a potential ROS publisher can be started while the robot is already running.
Everything is implemented in C++ but Python bindings are provided so user code can be written in either of the two languages. This allows the user to interface the robot from Python and, for example, easily integrate it with Python-based learning libraries (e.g. Gym), while still ensuring efficient execution of the timing-critical parts.
Back End
The back end (RobotBackend) is responsible for
talking with the actual hardware. It runs a loop that performs the following
steps:
get sensor data (called observations) from the robot and push them to the robot data.
get commands (actions) from the robot data and send them to the robot.
The back end itself is implemented in a robot-agnostic way, it just gets observations and actions and passes them on. The actual types of the latter are specified as C++ template arguments. For talking with the hardware, the back end holds an instance of a robot-specific driver class internally, which takes care of the actual communication with the robot (i.e. retrieving observations and sending actions).
Driver
The driver class has to be based on
RobotDriver and implements a few methods that
are needed to talk to the actual hardware. Most important are the ones for
getting observations and sending actions. Robot-specific initialization (e.g.
homing of the joints) is also performed here.
To ensure safe operation of the robot, the driver may modify
the desired action sent by the user to what will be the
actually applied action. For example in the case of our TriFinger robot
(implemented in the robot_fingers package), this
includes clamping to an allowed maximum torque max_torque and velocity
damping using a D-gain as follows:
applied_torque = desired_torque - K_d * velocity
We set max_torque and K_d such that the robot should not be able to
damage itself, even when sending random commands.
Todo
exact implementation of safety checks for TriFinger should be moved to the docs of robot_fingers.
The resulting applied action is reported back to the user, so the user can know what action really got applied to the robot.
See also Desired vs Applied Action.
Front End
The front end (RobotFrontend) provides the
user with an interface to access the RobotData. More specifically, it
implements methods get_observation()
to access the latest observations and
append_desired_action() to send
actions to the robot.
The front end class itself robot-agnostic. Only the types of observations and actions are robot-specific and provided through template arguments.
It would, in principle, be possible to directly access the data from RobotData. However, the front end, provides a more user-friendly interfaces that ensures that the data in the correct way. It does, for example, only provide reading access to observations and does not allow to change them.
Note that the user can only append actions to the time series, not apply them directly. An appended action will be applied by the back end once the time step to which it corresponds is reached. This gives the user the option to directly append actions for the next few steps at once.
Logger
When running experiments on the robot, it is often desired to store all data so they can later be analysed offline. For this, we provide a logger module that accesses the RobotData independently of the other modules and simply writes everything into a text file. This file can later easily be loaded, e.g. in a Python script that plots the data.
It is implemented in robot_interfaces::RobotLogger.
Time Series
The RobotData module stores all information in time series. A time
series is basically a buffer in which each entry is associated to a
specific time step. When at time step t a new element is added, it is
appended to the buffer and assigned to step t + 1. The time series
provides access to the data through the time index t. However, to keep
memory usage constant, only the last n elements are kept in memory
where n is a configurable parameter which is set to 1000 in our current
implementation.
When accessing an element t' that is in the future (i.e. t' > t_now),
the corresponding method will block and wait until that time step is
reached. This makes it easy for the user to write code that runs at the
control rate of the robot without having to add explicit sleeps.
Example Code:
while (True):
    t = robot.append_desired_action(action)

    # This call will sleep until time step t is reached and the observation
    # is available.
    observation = robot.get_observation(t)

    # In case it is relevant, the user can also see the actually applied
    # action to see how how the desired action got modified by the safety
    # checks
    applied_action = robot.get_applied_action(t)

    action = compute_new_action(observation)
See Logic of Actions and Observations on how the action and observation time series are synchronised.
Multi-process Architecture
It is possible to run the different modules (front end, back end, …) in separate processes by using the “multi-process robot data”. For more information see RobotData – Single or Multi Process.
Example Implementations
The following packages implement observation, action and driver classes for some actual robots and may serve as examples:
TriFinger robots: robot_fingers
Solo: robot_interfaces_solo
Bolt: robot_interfaces_bolt